
Deconstructing Chrome Extension basic repo structure
How things hang together behind the scene for a Chrome browser plugin

Let’s get right into it: a typical Chrome extension consist of the following folders structure
my-awesome-extension/
├── popup/
├── background/
├── content-scripts/
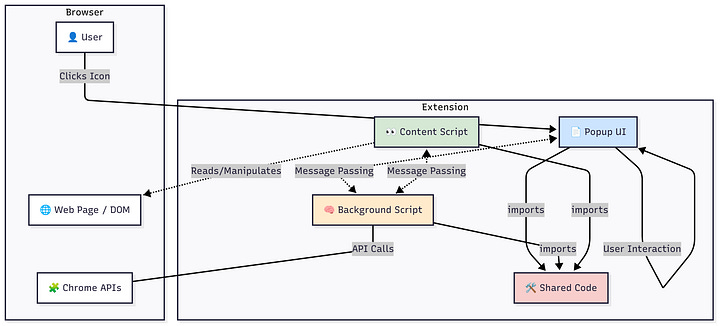
└── runtime/Those folders represent the core components of a modern Chrome extension. Here’s a breakdown of what each one does and a diagram showing how they work together.
Folder Explanations
Think of your Chrome extension as a small application with different parts that have specific jobs.
👩💻
popup (menu): This folder contains the code (HTML, CSS, JavaScript) for the small window that appears when you click the extension's icon in the browser toolbar. This is the main user interface your user will interact with directly.🧠
background (backend for frontend): This holds the background script. It's the hidden brain of your extension, running constantly as long as Chrome is open (or until it's suspended). It handles long-term tasks, manages the extension's state, and listens for browser events like a new tab being opened or an alarm going off. It's the central coordinator.👀
content-scripts (frontend): These are scripts that run directly on web pages you visit. They can read and modify the content (the DOM) of the web page. For example, a content script could be used to highlight specific words on a page or autofill a form. It's your extension's hands and eyes on the actual website.🛠️
runtime: This is a common practice for storing shared code or utility functions. To avoid repeating code, you might have functions in theruntimefolder that are used by thepopup,background, andcontent-scriptsalike. It's like a shared toolbox for the other parts of your extension.
How They Interact
These components are mostly isolated from each other for security reasons and must communicate by passing messages.
The User interacts with the Popup.
The Popup can’t do heavy lifting, so it sends a message to the Background script to perform an action (e.g., “save this note”).
The Background script can then use Chrome APIs (like accessing storage) or send a message to the Content Script on the active tab (e.g., “get the title of this page”).
The Content Script interacts with the web page, gets the title, and sends a message back to the Background script.
The Background script receives the title and might save it or send it back to the Popup to be displayed to the user.
Now - let’s build a quick vanilla Chrome extension
Step 1: Create the Project Folder and Manifest File
First, create a new folder for your extension. Inside that folder, create a file named manifest.json. This file is the blueprint for your extension; it tells Chrome what the extension does and how to run it.
Create a folder named
my-awesome-extension.Inside it, create a file named
manifest.json.Add the following code to
manifest.json:
(json)

{
  "manifest_version": 3,
  "name": "Awesome Extension",
  "version": "1.0",
  "description": "A simple awesome extension that shows a popup.",
  "icons": {
        "16": "images/icon16.png",
        "48": "images/icon48.png",
        "128": "images/icon128.png"
   },
   "action": {
      "default_icon": "images/icon16.png",
      "default_popup": "popup.html"
  }
}manifest_version: Must be3. This is the latest standard.name,version,description: Basic information about your extension.icons: Specifies the icons for your extension to use in different places (like the extensions page).action: Defines what happens when you click the extension's icon in the toolbar. Here, it openspopup.html.
Step 2: Create the Popup UI
The popup is the small HTML window that appears when you click the extension icon.
In your
my-awesom-extensionfolder, create a file namedpopup.html.Add the following code to it:
<HTML,XML>

<!DOCTYPE html>
 <html>
   <head>
    <title>Awesominator!</title>
    < style>
      body {
        width: 200px;
        text-align: center;
        font-family: sans-serif;
        }
     </style>
    </head>
    <body>
    <h1>Hello, Awesome People! 👋</h1>
    </body>
</html>
Step 3: Add Icons
Every extension needs icons to represent it in the browser.
Inside
my-awesome-extension, create a new folder namedimages.Create or download three PNG icons and save them in the
imagesfolder asicon16.png,icon48.png, andicon128.png. You can easily find placeholder icons online or create simple ones yourself.At this point, your project folder should look like this:
my-awesome-extension/
├── images/
│   ├── icon16.png
│   ├── icon48.png
│   └── icon128.png
├── manifest.json
└── popup.html
Step 4: Load the Extension in Chrome ⚙️
Now it’s time to see your extension in action.
Open Google Chrome and navigate to
chrome://extensions.In the top-right corner, turn on Developer mode.
Three new buttons will appear. Click on Load unpacked.
A file selection dialog will open. Navigate to and select your
my-first-extensionfolder.Your extension should now appear in the list! Pin it to your toolbar by clicking the puzzle piece icon (🧩) and then the pin icon next to your extension’s name.
Click on your new extension’s icon in the toolbar, and you should see your “Hello, World!” popup. Congratulations, you’ve built your first Chrome extension!
Next Steps: Adding More Functionality
To make your extension more powerful, you’ll want to add scripts.
Add a Content Script
A content script interacts with the web page the user is currently on.
Create a file named
content.jsin your main folder.Add a simple script, for example:
document.body.style.backgroundColor = 'lightblue';Update your
manifest.jsonto tell Chrome to run this script:
{   // ... keep everything from before
  "permissions": ["activeTab"],
  "content_scripts": [
                {
                  "matches": ["<all_urls>"],
                  "js": ["content.js"]
                }
      ]
}
permissions: You must request permission to interact with tabs.content_scripts: Tells Chrome to injectcontent.jsinto all web pages (<all_urls>).
After adding this, go back to chrome://extensions and click the refresh icon on your extension's card to apply the changes. Now, when you refresh any webpage, its background should turn light blue.
Add a Background Script
A background script runs in the background and handles events.
Create a file named
background.js.Add a script to listen for an event, like the extension being installed:
chrome.runtime.onInstalled.addListener(() => { console.log('Hello World Extension has been installed!'); });Update your
manifest.jsonto register the script:
{   // ... keep everything from before   "background":
  {
    "service_worker": "background.js"
  }
}
Now, after reloading the extension, you can inspect its background activity by clicking the “Service Worker” link on its card in the chrome://extensions page to see your console message.
💡 Found This Helpful?
Have you build a Chrome browser extension before or looking into building a new one? I’d love to hear about it. Share your building experience below.